
What is Docker?
Imagine being an astronaut on a space station and planning to go outside and enjoy the view. You’d be facing hostile conditions. The temperature, oxygen, and radiation are not what you were built for. Human beings require a specific environment to thrive. To properly function in any other scenario, like deep in the sea or high up in space, we need a system to reproduce that environment. Whether it is a spacesuit or a submarine, we need isolation and something that ensures the levels of oxygen, pressure, and temperature we depend on.
In other words, we need a container.
Any software faces the same problem as the astronaut. As soon as we leave home and go out into the world, the environment gets hostile, and a protective mechanism to reproduce our natural environment is mandatory. The Docker container is the spacesuit of programs.

Docker isolates the software from all other things on the same system. A program running inside a “spacesuit” generally has no idea it is wearing one and is unaffected by anything happening outside.

The containerized stack
- Application: High-level application (your data science project)
- Dependencies: Low-level generic software (think Tensorflow or Python)
- Docker container: The isolation layer
- Operating system: Low-level interfaces and drivers to interact with the hardware
- Hardware: CPU, Memory, Hard disk, Network, etc.
The fundamental idea is to package an application and its dependencies into a single reusable artifact, which can be instantiated reliably in different environments.
How to create a container?
The flow to create Docker containers:
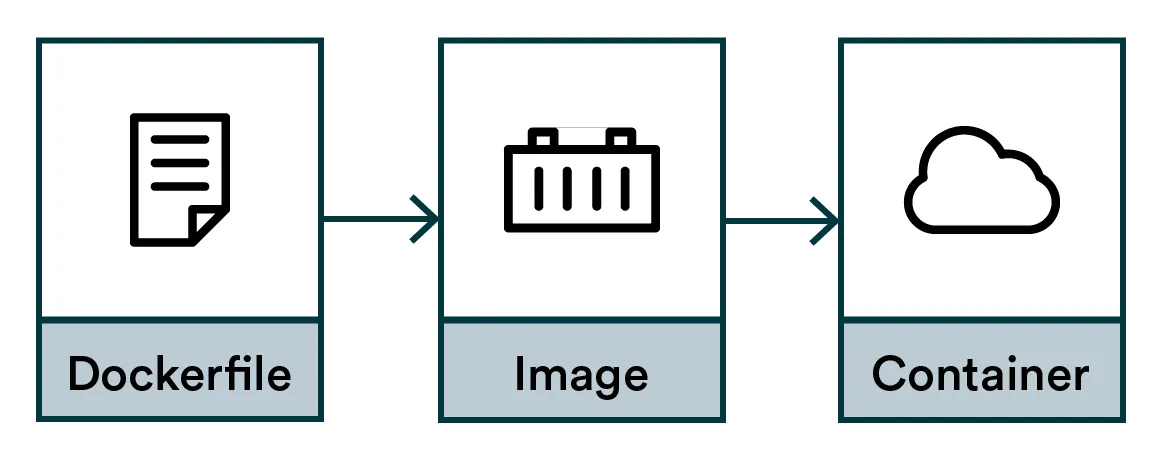
- Dockerfile: Instructions for compiling an image
- Image: Compiled artifact
- Container: An executed instance of the image
Dockerfile
First, we need instructions.
We could define the temperature, radiation, and oxygen levels for a spacesuit, but we need instructions, not requirements. Docker is instruction-based, not requirement-based. We will describe the how and not the what. To do that, we create a text file and name it Dockerfile.
# Dockerfile

FROM python:3.9
RUN pip install tensorflow==2.7.0
RUN pip install pandas==1.3.3
The FROM command describes a base environment, so we don’t need to start from scratch. A treasure trove of base images can be found from the DockerHub or via google searches.
The RUN command is an instruction to change the environment.

Note: While our example installs Python libraries one by one, that is not recommended. The best practice is to utilize requirements.txt, which defines the Python dependencies. Follow the best practices from our previous chapter to create one.
# Dockerfile with requirements.txt

FROM python:3.9
COPY requirements.txt /tmp
RUN pip install -r /tmp/requirements.txt
The COPY command copies a file from your local disk, like the requirements.txt, into the image. The RUN command here installs all the Python dependencies defined in the requirements.txt in one go.
Note: All the familiar Linux commands are at your disposal when using RUN.
Docker image
Now that we have our Dockerfile, we can compile it into a binary artifact called an image.
The reason for this step is to make it faster and reproducible. If we didn’t compile it, everyone needing a spacesuit would need to find a sewing machine and painstakingly run all the instructions for every spacewalk. That is too slow but also indeterministic. Your sewing machine might be different from mine. The tradeoff for speed and quality is that images can be quite large, often gigabytes, but a gigabyte in 2022 is peanuts anyway.
To compile, use the build command:
docker build . -t myimage:1.0This builds an image stored on your local machine. The -t parameter defines the image name as “myimage” and gives it a tag “1.0”. To list all the images, run:
docker image list

REPOSITORY          TAG                 IMAGE ID            CREATED             SIZE
<none>              <none>              85eb1ea6d4be        6 days ago          2.9GB
myimagename         1.0                 ff732d925c6e        6 days ago          2.9GB
myimagename         1.1                 ff732d925c6e        6 days ago          2.9GB
myimagename         latest              ff732d925c6e        6 days ago          2.9GB
python              3.9                 f88f0508dc46        13 days ago         912MB
Docker container
Finally, we are ready for our spacewalk. Containers are the real-life instances of a spacesuit. They are not really helpful in the wardrobe, so the astronaut should perform a task or two while wearing them.
The instructions can be baked into the image or provided just in time before starting the container. Let’s do the latter.
docker run myimagename:1.0 echo "Hello world"This starts the container, runs a single echo command, and closes it down.
Now we have a reproducible method to execute our code in any environment that supports Docker. This is very important in data science, where each project has many dependencies, and reproducibility is at the heart of the process.
Containers close down automatically when they have executed their instructions, but containers can run for a long time. Try starting a very long command in the background (using your shell’s & operator):
docker run myimagename:1.0 sleep 100000000000 &You can see our currently running container with:
docker container listTo stop this container, take the container ID from the table and call:
docker stop <CONTAINER ID>This stops the container, but its state is kept around. If you call
docker ps -aYou can see that the container is stopped but still exists. To completely destroy it:
docker rm <CONTAINER ID>The single command combining both stopping and removing:
docker rm -f <CONTAINER_ID>To remove all stopped leftover containers:
docker container pruneTip: You can also start a container with an interactive shell:
$ docker run -it myimagename:1.0 /bin/bash
root@9c4060d0136e:/# echo "hello"
hello
root@9c4060d0136e:/# exit
exit
$ <back in the host shell>
It is great for debugging the inner workings of an image when you can freely run all the Linux commands interactively. Go back to your host shell by running the exit command.
Terminology and Naming
Registry = Service for hosting and distributing images. The default registry is the Docker Hub.
Repository = Collection of related images with the same name but different tags. Usually, different versions of the same application or service.
Tag = An identifier attached to images within a repository (e.g., 14.04 or stable )
ImageID = Unique identifier hash generated for each image
The official documentation declares:
An image name is made up of slash-separated name components, optionally prefixed by a registry hostname.
It means that you can encode registry hostname and a bunch of slash-separated “name components” into the name of your image. Honestly, this is quite convoluted, but such is life.
The fundamental format is <name>:<tag>, but in practice it is <registry>/<name-component-1>/<name-component-2>:<tag>.
It may vary per platform. For Google Cloud Platform (GCP) the convention is: <registry>/<project-id>/<repository-name>/<image>@<image-digest>:<tag>
It is up to you to figure out the correct naming scheme for your case.

Note: The latest tag will be used if you pull an image without any tags. Never use this latest tag in production. Always use a tag with a unique version or hash instead since someone inevitably will update the “latest” image and break your build. What is the latest today is no longer the latest tomorrow! The astronaut doesn’t care about the latest bells and whistles. They just want a spacesuit that fits them and keeps them alive. With latest you might not get what you expect.
Docker images and secrets
Just like it is a terrible practice to push secrets into a git repository, you shouldn’t bake them into your Docker images either!
Images are put into repositories and passed around carelessly. The correct assumption is that whatever goes into an image may be public at some point. It is not a place for your username, password, API token, key code, TLS certificates, or any other sensitive data.
There are two scenarios with secrets and docker images:
- You need a secret at build-time
- You need a secret at runtime
Neither case should be solved by baking things permanently into the image. Let’s look at how to do it differently.

Build-time secrets
If you need something private - say a private GitHub repository - to be pulled into the image at build time, you need to make sure that the SSH keys you are using do not leak into the image.
Do NOT use COPY instruction to move keys or passwords into the image! Even if you remove them afterward, they will still leave a trace!
Quick googling will give you many different options to solve this problem, like using multi-stage builds, but the best and most modern way is to use BuildKit. BuildKit ships with Docker but needs to be enabled for builds by setting up the environment variable DOCKER_BUILDKIT.
For example:
DOCKER_BUILDKIT=1 docker build .BuildKit offers a mechanism to make secret files safely available for the build process.
Let’s first create secret.txt with the contents:
TOP SECRET ASTRONAUT PASSWORDThen create a new Dockerfile:
FROM alpine
RUN --mount=type=secret,id=mypass  cat /run/secrets/mypass
The --mount=type=secret,id=mypass is informing Docker that for this specific command, we need access to a secret called mypass (the contents of which we’ll tell the Docker build about in the next step). Docker will make this happen by temporarily mounting a file /run/secrets/mypass.
The cat /run/secrets/mypass is the actual instruction, where cat is a Linux command to output the contents of a file into the terminal. We call it to validate that our secret was indeed available.
Let’s build the image, adding --secret to inform docker build about where to find this secret:
DOCKER_BUILDKIT=1 docker build . -t myimage --secret id=mypass,src=secret.txtEverything worked, but we didn’t see the contents of secret.txt printed out in our terminal as we expected. The reason is that BuildKit doesn’t log every success by default.
Let’s build the image using additional parameters. We add BUILDKIT_PROGRESS=plain to get more verbose logging and --no-cache to make sure caching doesn’t ruin it:
DOCKER_BUILDKIT=1 BUILDKIT_PROGRESS=plain docker build . --no-cache --secret id=mypass,src=secret.txtAmong all the logs printed out, you should find this part:
5# [2/2] RUN --mount=type=secret,id=mypass cat /run/secrets/mypass
5# sha256:7fd248d616c172325af799b6570d2522d3923638ca41181fab438c29d0aea143
5# 0.248 TOP SECRET ASTRONAUT PASSWORD
It is proof that the build step had access to secret.txt.
With this approach, you can now safely mount secrets to the build process without worrying about leaking keys or passwords to the resulting image.
Runtime secrets
If you need a secret - say database credentials - when your container is running in production, you should use environment variables to pass secrets into the container.
Never bake any secrets straight into the image at build time!
docker run --env MYLOGIN=johndoe --env MYPASSWORD=sdf4otwe3789These will be accessible in Python like:
os.environ.get('MYLOGIN')
os.environ.get('MYPASSWORD')
Tip: You can also fetch the secrets from a secret store like Hashicorp Vault!
GPU support
Docker with GPUs can be tricky. Building an image from scratch is beyond the scope of this article, but there are five prerequisites for a modern GPU (NVIDIA) container.
Image:
- CUDA/cuDNN libraries
- GPU versions of your framework like Tensorflow (when needed)
Host machine:
- GPU drivers
- NVidia Docker Toolkit
- Docker
runexecuted with--gpus all
The best approach is finding a base image with most prerequisites already baked in. Frameworks like Tensorflow usually offer images like tensorflow/tensorflow:latest-gpu, which are a good starting point.
When troubleshooting, you can first try to test your host machine:
nvidia-smiThen run the same command inside the container:
docker run --gpus all tensorflow/tensorflow:latest-gpu nvidia-smiYou should get something like this for both commands:
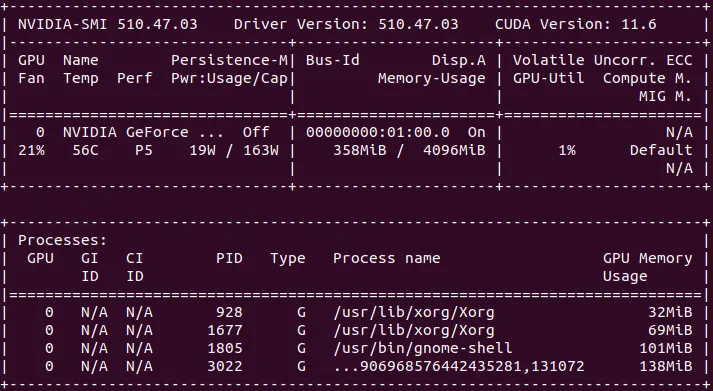
If you get an error from either, you’ll have an idea whether the problem lies inside or outside the container.
It’s also a good idea to test your frameworks. For example Tensorflow:
docker run --gpus all -it --rm tensorflow/tensorflow:latest-gpu python -c "import tensorflow as tf;print(tf.reduce_sum(tf.random.normal([1000, 1000])))"The output may be verbose and have some warnings, but it should end with something like:
Created device /job:localhost/replica:0/task:0/device:GPU:0 with 3006 MB memory: -> device: 0, name: NVIDIA GeForce GTX 970, pci bus id: 0000:01:00.0, compute capability: 5.2
tf.Tensor(-237.35098, shape=(), dtype=float32)
Docker containers vs. Python virtual environments

Our last chapter about Python dependency management talked about Python virtual environments and how they create a safety bubble between different Python projects in your local development environment. Docker containers solve a similar problem but on a different layer.
While a Python virtual environment creates the isolation layer between all Python-related things, a Docker container achieves this for the entire software stack. The use-cases for Python virtual environments and Docker containers are different. As a rule of thumb, virtual environments are enough for developing things on your local machine while Docker containers are built for running production jobs in the cloud.
To put it another way, for local development virtual environments are like wearing sunscreen on the beach, while Docker containers are like wearing a spacesuit – usually uncomfortable and mostly impractical.
Want more practical engineering tips?
Data scientists are increasingly part of R&D teams and working on production systems, which means the data science and engineering domains are colliding. We want to make it easier for data scientists without an engineering background to learn the fundamental best practices of engineering.
We are compiling a guide on engineering topics that we hear data science practitioners think about, including Git, Docker, cloud infrastructure and model serving.
Download the preview edition of the Engineering Practices for Data Scientists and receive the full eBook when we release it.